Saturday, August 31, 2013

I suddenly want to spoil my daughter and my husband with chocolate cake. But I'm pretty busy today and not in a mood to bake something big. So, I decide to make them another cake in mug. I made blueberry muffin using microwave and they love it. Why not try to make a cake using the same method? Besides, I have to admit that I'm falling in love in making cake or muffin using microwave. Fast, simple, and i can make it in small amount and portion. The most important thing is the taste is good.


So today, I'm going to make Chocolate Coffee Honey Cake using a microwave. It is simple, easy, and taste good. Just mix all the ingredients, pour it into the microwave save mug/ramekin, and put it into the microwave. Set the microwave on high and microwave it for 90 seconds. It taste great. Bitter sweet choco cake with a little bit coffee and honey taste. I love it. My husband and daughter like it too. Even my little baby like it. He ate 1/3 portion of the cake by himself.


Ingredients (Serving for 2 portion) :

  • 3 tbs All purpose flour
  • 3 tbs white granulated sugar
  • 1 tsp instant granulated coffee/ instant coffee powder
  • 2 tbs cacao powder
  • 1/4 tsp baking powder
  • 1/8 tsp cinamon powder
  • 2 tbs milk
  • 1 egg
  • 1 - 1 1/2 tbs honey
  • 2 tbs oil
  • Butter for greasing the mug/ramekins
Preparation :
  1. Grease 2 mugs or ramekins with butter, set aside
  2. In a bowl, mix all the dry ingredients

  3. Add all the wet ingredients to the mixed dry ingredients.
  4. With a fork or small whisk, mix well all the ingredients until a chocolate batter formed. 
  5. Divide the batter into 2 greased mugs/ramekins
  6. Set the microwave on high, and microwave the batter for 90 sec. Microwave 1 mug/ramekin at the the time.
  7. Take it out from microwave, and let it cool for a while.
  8. Dust the top with powdered sugar if you like.
I'm using ramekin (with 8.5 cm diameter) instead of mug. And the result is the cake rise up like a soufle. I like it. It looks pretty for me. :-)

Thursday, August 29, 2013

Today I really want to bake something easy for my kids snack. Hmm... I still have some puff pastry in my fridge and a can of sausage on my kitchen storage. I think sausage rolls is a good idea. It is easy and simple to make. I have all the ingredients as well. It is a snack or can be an appetizers based on sausage. In Netherlands, it is famous as sauzijzenbroodje. It is usually made from spiced ground beef and wrapped with puff pastry. In America, it is popular as pig in a blanket. Pig in a blanket is usually made using hot dog and puff pastry.

Well, actually what i will make today is using a recipe of pig in a blanket. But I don't really like the name. I don't know why. I think it sounds funny. I prefer to name it sausage roll. And I will make it in small size. One bite size. 

Ingredients (for making 20 sausage rolls) :
  • Ready to use puff pastry. I'm using 5 layer of 20x20 ready to use puff pastry.
  • 3-4 tbs honey mustard
  • 1 can cocktail sausages
  • 1 egg, beaten.
  • grated cheese
Tip : I'm using honey mustard because i don't really like the strong taste of the normal mustard. If you do not have mustard or do not like it at all, you can always use tomato sauce instead of mustard. 

Preparation :
  1. Heat the oven for 200 C (about 390F).
  2. Line a baking sheet with a baking paper, set aside.
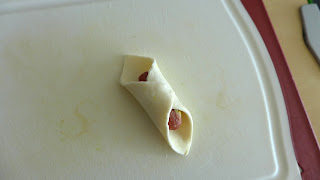
  3. Cut puff pastry into small square (about 10x10 cm).
  4. Put about 1/4 tsp honey mustard in the middle of each square.
  5. Put 1 cocktail sausage on the top of the mustard diagonally.
  6. Using pastry brush, wash the edge of each pastry square with beaten egg.
  7. Roll the sausage with the puff pastry. 

  8. Put the sausage rolls in the baking sheet.
  9. Brush the top of the sausage roll with the remaining egg wash.
  10. Add some grated cheese on the top of it.
  11. Put the baking sheet into preheated oven and bake for about 20 min until golden brown.
This mini sausage rolls is perfect for party as well. I made this dish for my daughter's birthday party few months ago, and she and her friends loved them. 

Tuesday, August 27, 2013

Good morning. Time for breakfast. We all know that breakfast is very important to begin our day. Why? Eating a healthy breakfast will give our body and brain a boost of energy. It help us to do our daily activity. Our body and brain need energy in order to do what their best and breakfast is a good thing to give them a fuel. Breakfast will help us to feel happier, less stress, and less moody. It is good for our waistline as well ! Studies have shown that eating breakfast can help to increase our calories burning rate. With having breakfast every morning, we tend not to feel hungry until lunch time or having high sugar and fatty snacks. What a power of breakfast!!

But.. of course. What i meant with breakfast is not a cup of coffee or cappuccino or a chocolate bar. A healthy breakfast need some requirement which are : contains source of carbohydrate, contains source of protein, and fruits. But it has to be light but can make us feel enough. Not hungry but not too full.

This morning, I'm going to make a whole grain blueberry muffin for me and my daughter. I know what you're thinking. Making muffins in the morning? beating batter, prepare the oven, prepare the muffin tin. Ughh... A lot of trouble in the morning. :-( Hey! I don't like it either. But this is different. I only need measuring spoons and a mug. No baking? No. It is microwave time. 90 seconds only. I got the original recipe from budgetbytes.com. With 2 times experiments and a little bit modification, I managed to make this muffin.


Well... the texture is not as good as full recipe baked muffins but the taste is not bad either. Quite the contrary. It is good. Let's get started.

Ingredients :
  • 2 tbs Whole wheat flour
  • 2 tbs All Purpose flour
  • 1 tbs brown sugar
  • 1/4 tsp baking powder
  • 1/8 tsp salt
  • 1/8 tsp cinnamon powder 
  • 1 tbs unsalted butter
  • 2 1/2-3 tbs milk
  • 1 1/2 tbs frozen/ fresh blueberry
Preparation :
  1. In a microwave proof mug, put all dry ingredients together.
  2. With a spoon, mix all those dry ingredients.

  3. Add butter into the mixed dry ingredients. 
  4. Mix the butter well until it is incorporated. Use your finger if needed or if your butter is too firm.
  5. Add milk. Mix them well. Do not forget to scrap the bottom of the mug to make sure no flour left behind on the bottom of the mug.
  6. Add frozen /fresh blueberry into the batter in the mug. Push them into the batter.
  7. Set the microwave on high. And microwave the batter for about 90 seconds.
  8. Remove from the microwave after it is done. Be careful. It can be very hot. Let it cool for a while.

    This muffin is good not only for breakfast but for snack as well. Enjoy :-)

Monday, August 26, 2013

For my strawberry cup cake, i think strawberry frosting is a perfect "partner". I tried to find the recipes on the internet and I found one at Allrecipes. I will make strawberry frosting based on that reference with my own modification. I will use my frozen strawberry instead of fresh strawberry. I will defrost it, make a strawberry puree out if it, and use this for my frosting. The cream will have slightly strawberry flavor. No need artificial strawberry flavor, no need coloring agent. This cream is not only good at taste but at texture as well. The cream frosting is still firm and not getting wet on room temperature. I definitely going to make this frosting again next time.


Ingredients (for decorating 40-48 mini cupcake):

  • 85 grams (about 1/2 cup) frozen strawberry, defrosted and pureed.
  • 115 grams (1/2 cup) unsalted butter
  • 190 grams (1 1/2 cups) powdered sugar, sifted
  • 1 tbs vanilla extract
Preparation : 
  1. In a sauce pan, boil and stir strawberry puree until the volume is reduced at least by 1/2. Leave it to cool completely.
  2. In a big bowl, beat the butter until soft and creamy.
  3. Add about 1/2 cup of powdered sugar or about 1/3 part of the sugar. Beat them well.
  4. Add about 2 tbs strawberry puree into the cream. Beat it again.
  5. Add another 1/2 cup of powdered sugar, beat the cream, and add another 2 tbs strawberry puree. Beat it well again. 
  6. Repeat step 5 one more time.
  7. Add vanilla extract and beat the cream again. 
Tip : You can always adjust the sweetness by increasing or reducing the amount of powdered sugar. But do not forget to adjust the amount of strawberry puree as well. If the cream is too runny, add more powdered sugar (about 1/2 cup at the time). If the cream is too thick, add more strawberry puree (about 1-2 tbs at the time).  

This is link for my strawberry cup cake recipe : http://sellyscorner.blogspot.nl/2013/08/strawberry-cupcake.html. Enjoy! 

Today, I want to make something sweet using strawberry. 2 weeks ago, I bought one box of frozen strawberry with no reason and keep it on my fridge. I wanted to make strawberry smoothie but i never had a chance to do it. This frozen strawberry has been sitting on the bottom of my fridge under another frozen things. Poor them...

Until few days ago. I got an invitation for my friend baby shower. She's going to have a baby girl soon. I decided that I'm going to make her a pink cup cake (too bad at the end I could't come because of an unexpected thing. I already finished the cake though). Strawberry cup cake with strawberry butter cream frosting. I will use my frozen strawberry (Finally i can make it useful) not some artificial strawberry flavor with pink coloring agent.

Well.. I'm going to make mini cup cake actually. Not normal size cupcake. I love this one bite cup cake. One or two bites, and done. Perfect for portion control and good for people who don't really like sweet thing. I'm sure one normal cup cake is too big for them. That's why I would like to say this is a fun size.


Ingredients (for about 45-48 mini cupcakes):
  • 150 grams (3/4 cup) white granulated sugar
  • 1/2 pack (45 grams) instant strawberry gelatin powder
  • 115 grams (1/2 cup) unsalted butter, room temperature
  • 2 eggs
  • 180 grams (1 1/2 cups) All purpose flour
  • 1 1/4 tsp baking powder
  • 120 ml (1/2 cup) milk, room temperature
  • 1 tbs vanilla extract
  • 75 grams (about 1/4 cup) frozen strawberry, defrosted and pureed 
Tip : You can adjust the amount of sugar by yourself depend on the sweetness of your strawberry. 

Tip : You can use normal gelatin powder with the same amount or even skip this ingredient. It is optional. But if you do this, you need to increase the amount of strawberry puree by 5-10 grams. 

Preparation :
  1. Prepare and layer muffin tin using muffin paper. Set aside
  2. Preheat the oven to 170 C (about 350 F).
  3. In a bowl, mix flour and baking powder together. Sift and set it aside. 
  4. Separate egg white and egg yolk into different bowl.
  5. Whip the egg white until soft peak formed, set it aside.
  6. Using a hand mixer, beat together : butter, sugar, and gelatin powder
  7. Add egg yolk one by one and beat them again.
  8. Add flour and baking soda into the batter gradually
  9. Add milk and mix them well
  10. Add strawberry puree into the batter and fold it 
  11. Add 1/3 part of egg white foam into the batter. Fold it carefully (do not stir or mix it too hard). Scrap the bottom of the bowl and fold it over the top. Do it until the egg white is mixed well and the batter is a little bit lightened.
  12. Add another 1/3 part of egg white foam and fold it again
  13. Add the rest of the foam and fold it again until all the foam is incorporated and the batter is lightened.
  14. Pour the batter into muffin tin (about 1 1/2 tsp for each cup or about 3/4 full)
  15. Put it into preheated oven and bake the cake for about 25 minutes (Until toothpick inserted in the center of the cake comes out clean). For mini muffins : bake for about 20 minutes.
  16. Let the cakes cool completely and decorate them with cream frosting or any kind of your favorite cup cake decoration.

Tip : This strawberry cup cake goes well with vanilla, cream cheese, or strawberry topping. I was using strawberry cream frosting for this cup cake. This is the link for my strawberry frosting recipe : http://sellyscorner.blogspot.nl/2013/08/strawberry-cream-frosting.html


Thursday, August 22, 2013

My daughter had a request for me yesterday. She wanted to have fried prawn for her dinner. So, i decided to make Ebi Furai. It is a very popular dish in Japan. I found the recipe for this this last year from Cooking with dog channel on Youtube and since then I became one of her fans. I remade her Ebi Furay recipe few times and they always become a hit. We all love it. It is so delicious. It is crispy outside and soft and chewy inside.


Ingredients (Serving for 3-4 portion):
  • 15 prawns
  • 3 tbs flour
  • 2 eggs, beaten
  • about 100-130 grams panko (Japanese bread crumb)
  • about 2 cups vegetable oil

Preparation :
  1. Peel the skin of the prawns but leave the tail on. 
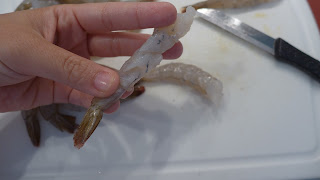
  2. Remove the vein using a tooth pick.
  3. Wash and rinse the prawns under the running water.
  4. Dry them well
  5. Make a shallow diagonally cut on the bottom of the shrimp
  6. Press the prawn on the cutting board to prevent the prawn curling up during frying process. 
  7. Sprinkle salt and pepper on the prawn
  8. Prepare the flour on the plate, beaten egg, and bread crumbs on another plate
  9. Heat the oil on the pan
  10. Dip the prawn into flour
  11. Dip the coated prawn into beaten egg
  12. Dip it again into breadcrumbs and coat it well. If you want to have a thick breadcrumbs blanket covering the prawn, dip it again into beaten egg, and coat it again with breadcrumbs.
  13. Carefully put the prawn into preheated oil.
  14. Deep fry the prawn until it become golden brown
  15. Remove the prawn from the oil and drain it well.
  16. Remove the excess oil using a kitchen paper.
The original recipe requires tartar sauce for the sauce. Too bad i run out mayonnaise and cucumber pickle so i could not make it. I was using sweet chili sauce instead. It was still great. 15 ebi furay on the plate, and 5 minutes later they were gone. POOF!! Disappear. Definitely going to make it again next time. 


Tuesday, August 20, 2013

Welcome back everyone. I've already talked about all purpose and whole wheat flour before. It's time to continue my topic about whole wheat flour. Let's refresh for a while. :)

All Purpose flour is a type of wheat flour which was made by grinding only from the endosperm of wheat. Whole wheat flour is one type of flour which is made from wheat flour which is composed of 99% wheat grain. It is made by grinding the whole grain of wheat including the bran and the germ. Why does people even bother to include the bran and the germ?

Before answering that question, I'll tell you a short story about wheat flour. At the beginning, people always
remove the bran and the germ during the process of making white flour in order to extend its shelf life. The bran and the germ contain oil and high moisture content which causing oxidation process. The oxidation process can make the flour become rancid and make its shelf life shorter. During the extraction process, about 40% of the original wheat grain was removed. Too bad, by removing the bran and the germ making the white flour lack of nutrition and vitamins. So, with advanced technology, people start to enrich the flour with many vitamins and mineral in order to improve the nutrition content of white flour.

Lately, there have been many researches that showed if the bran and the germ of whole wheat naturally contain many nutrition which can improve the health benefit of the flour itself. Since then, people start to think about whole grain flour. I don't want to talk about eating whole wheat bread causing weight lost, or something like that. I only want to tell a story about this because many of food journals and researches, classified whole grain as a functional food or super food because its  health benefits. Hmm... What is functional food?

Functional Food

In the last decade, preventive medicine has undergone a great advance. Research has demonstrated that nutrition plays a crucial role in the prevention of chronic diseases [Lopez-Varela et al. 2002 in Otles and Ozlem. 2006]. People prefer to do preventive method than get sick and treat it with the medicine. From that fact, we have what we call as functional foods. Functional food is a modified food that claims to improve health or well being by providing benefit beyond that of the traditional nutrient.

Functional food can be whole food or food product with additional or enhanced nutrition which will improve its health benefit.  Functional foods for health are an important part of an overall healthy life style that includes balanced diet and physical activity. But. functional foods are not medicine or "magic bullets" that can make a disease disappear. This foods only will provide many potentially health benefits and the best advice is to include variety of foods on our daily diet.

There are some functional components inside functional foods. Some example of those functional components are :
  • Carotenoid, such as beta carotene, lutein, and lycopene
  • Dietary fiber, such as insoluble fiber, beta glucan, soluble fiber, whole grains
  • Fatty acid, such as monosaturated fatty acids, and polyunsaturated fatty acid
  • Flavonoids, such as anthocianins, and flavanols
  • Isothiocyanates, such as sulforaphane
  • Minerals, such as calcium, magnesium, and selenium
  • Phenolic acidm, such as caffeic acid
  • Sulfides
  • Sterols
  • Polyols
  • Prebiotic, such as Fructooligosaccharides
  • Probiotic, such as Lactobacilli and Bifidobacteria
  • Phytoestrogens, and
  • Vitamins 
Source : http://www.docstoc.com/docs/7273082/Functional-Food-Guide-Pyramid

Wow. so many of them. What are they? I could write a book and not a blog anymore if i explain them one by one. It is complicated. I still remember few years ago, I and my friends suddenly got a headache when we studied this topic for the first time. And I just got another headache.
So, Let's back to the topic. Whole wheat flour. Why does whole wheat flour can be categorized as functional food?

Whole Wheat as a Functional Food

Whole wheat flour is made from whole wheat grains. Whole grains could be an important source of dietary antioxidants, dietary fiber, minerals, and vitamins.

First. Wheat bran cereals could be an  important source of dietary antioxidant. Wheat bran contains phenolic acid which is functioned as antioxidant. Phenolic acid occur naturally in plants. This acid are primarily found in the seeds and skins of fruit  as well. Once ingested, the phenolic acids get absorbed when they reach intestinal tract.  Pheolic acid works to prevent free radical damage in body by protecting the cells in the body.

Second. Whole wheat grain contains pretty high dietary fiber. Based on USDA Nutrient Standard Reference Database, whole wheat flour has higher content of dietary fiber (10.1 grams/100 grams flour) than regular white flour (2.7 grams/100 grams flour). There are 2 types of dietary fiber, which is soluble fiber ( can be dissolved in water, and fermented in colon) and insoluble fiber ( can not be dissolved in water). Both of them are good and needed for body's health.

Wheat bran contains high insoluble fiber.  Insoluble fiber is a fiber (Non-starch polysaccharide) that is found in the cell walls of plants. This fiber can not be digested and absorbed but it will remain in large intestine before passing out in the feces. Even this fiber can not be absorbed, it has great ability to absorb water, and bind the other residues to itself. This process ensuring the feces soft and bulky. That's why, it is good to prevent constipation which is bad to digestive health and can irritate the intestine. Some research said that insoluble fiber helps to balance intestinal pH (acid-alkaline balance), stimulate friendly bacterial flora and fermentation process in large intestine, produce short-chain fatty acid, and reduce the risk of colon cancer.  Wheat bran itself contains 42.8 grams dietary fiber / 100 grams flour. Pretty high, isn't it? To maintain digestive health, it is recommended to consume at least 30 grams dietary fiber/ day for average adults.

Third.  In whole wheat grains, many vitamins and mineral are concentrate in bran and germ. Wheat bran and germ contain high vitamins especially B vitamins  (except vitamins B12), and mineral such as Iron, Calcium, Magnesium, and Selenium. This will cause whole wheat flour has more vitamins and mineral contains than regular white flour. For example : whole wheat flour has 0.502 mg Thiamin (Vit B1)/ 100 grams flour, meanwhile unenriched all purpose flour has only 0.120 mg / 100 grams flour. Whole wheat flour contains 4.957 mg Niacin (Vit B3) / 100 grams flour, meanwhile regular white flour only contains  only 1.250 mg/ 100 grams flour.
Vitamin Content of Whole Wheat Flour
Source : USDA Nutrient Standard Reference Database

Vitamin Content of Unenriched All Purpose Flour
Source : USDA Nutrient Standard Reference Database

Because of this problems, there is a rule that white flour has to be enriched with vitamin B in order to fortified micronutrients that are lost during processing and milling. B Vitamins is very important to support maintenance of mental function, cell growth, and to help the regulation of metabolism and hormone synthesis. B Vitamin, especially B1 deficiency causing a disease named beri-beri.

Whole wheat grains contains a lot of minerals as well, such as Calcium, Iron, Selenium, Magnesium, and Phosphorus. The bran itself contains Iron, Calcium, and Phosphorus. Therefore, whole wheat flour has higher mineral content than regular white flour.

Calcium can reduce risk of osteoporosis. Magnesium can support maintenance of normal muscle and nerve function. Selenium  can help to neutralize free radicals which may damage cell and supports maintenance of immune and prostate health. Iron is part of protein and enzymes which can help carry oxygen in blood and help maintenance of muscle and cell growth in the body.
Mineral Content of Whole Wheat Flour
Source : USDA Nutrient Standard Reference Database

Mineral Content of Unenriched All Purpose Flour
Source : USDA Nutrient Standard Reference Database

 Beside all those good advantage, whole wheat flour still have some disadvantage which are :
  • Whole wheat flour has shorter shelf life than regular white flour. The wheat germ has higher fat content than the endosperm which is causing whole wheat flour has more fat than white flour. That is why without proper storage whole wheat flour can become bad and rancid because of fat oxidation. The shelf life of whole wheat flour is about 6 months-1 year in the freezer if stored in tightly sealed plastic containers and only few months in a cabinet.
  • Whole wheat flour contains phytic acid which may limit the absorption of Calcium and Iron. Phytic acid, in food science world, is one of chelating agent. Chelating agent has a great ability to bind with metal ions such as Calcium and Iron. This ability may help to stabilize food color, aroma, and texture. In whole wheat grains, calcium and iron are bound to phytic acid and make them insoluble and limit their absorption in the body.
  • Whole wheat flour can not form gluten as good as white flour. I think i already explained the reason on my previous post about all purpose flour vs. whole wheat flour.  The bran on whole wheat flour can do some physical disruption of expanded gluten matrix. Bran can cut trough gluten matrix during the kneading or mixing and thus will weaken the gluten structure formed. Beside that, it is possible that there is a competition between bran and gluten protein to absorb water during the process. It will decrease the gluten that formed because gluten formation definitely needs water. Wheat germ contains a substance called glutathione as well. Glutathion is common called as a gluten inhibitor which is able to limit the development of gluten.

Wow. There are a lot of thing that we can talk about whole wheat flour. And there are still a lot more of it. A day won't be enough. Nowadays, we can find a lot of whole wheat product in the market. Bread, pasta, cake, pancakes, cereals, etc. Personally, white bread is still my favorite. But I don't mind changing to whole wheat pasta, or making cake or pancake using whole wheat flour (using a good ratio combination of flour of course). For me, the most important thing is to have a balance and wide variety of food on my daily diet. How about you? :-)

References :

Monday, August 19, 2013

It's noodle time!! Yay! I LOVE noodle. I love any kind of noodle. With any kind of shape, taste, sauce, condiment. As long as it is eatable, i will love it. Egg noodle, rice noodle, mung bean noodle, you name it (including instant noodle. Oh.... It is my guilty pleasure).

This morning, i saw a picture of my friend in Facebook. A noodle. One of my favorite noodle that is sold in one restaurant my hometown. The picture is so appealing. And suddenly i really want to cook noodle for our dinner. I think i still have 2 packs of egg noodle. Let's get creative. I'm going to cook it and serve it with crispy chicken and teriyaki sauce.


Ingredients (Serving for 4 portion) :

For noodle :
  • 300 grams egg noodle. I'm using 1,5 pack of egg noodle  "Kuda Menjangan".
    This is what i have in hand at the moment. You can use any brand of egg noodle or Chinese noodle. Some brand even already divide the noodle into 1 portion package. 
  • 4 tbs vegetable oil
  • 3 tbs soy sauce
  • 1/4 tsp ground pepper
For crispy chicken :
  • 250 grams boneless chicken, cut into slices.
  • 2 tbs flour + 4 tbs four
  • 1 beaten egg
  • 1/4 tsp garlic powder
  • salt and pepper
  • 1 tbs corn starch (maizena)
  • 2 cups vegetable oil
For teriyaki sauce :
  • 100 grams champignon mushroom, cut into slices
  • 1 medium onion, cut into stripes
  • 2 tbs vegetable oil
  • 6 tbs water
  • 3 tbs soy sauce
  • 3 tbs mirin (sweet rice wine)
  • 5 tsp sugar
  • 1/8 tsp garlic powder
  • 1/8 tsp ginger powder
  • mixture of 1 tbs water + 1 tsp corn starch
Additional vegetable : 
  • 300 grams bok choy/ pak choy
    or any kind of Chinese cabbage 

Preparation :
First let's make the crispy chicken :
  1. In a bowl, season the sliced chicken with garlic powder, salt and pepper. Set it aside.
  2. Meanwhile, in a separate plate or bowl, mix well 4 tbs flour and 1 tbs corn starch. Set aside
  3. After about 10 minutes, dust all the surface of the sliced chicken with flour. It will need about 2 tbs flour. 
  4. In a pan, heat the oil to fry the chicken. 
  5. Dip 1 slice of floured chicken into beaten egg. 
  6. Dip it again into mixture of flour and corn starch. Make sure it is coated well with the flour.
  7. Fry the chicken in the pan until golden brown. 
  8. Remove the chicken from the pan and drain the oil.
  9. Remove the excess oil using kitchen towel if needed.
Let's prepare the sauce : 
  1. In a sauce pan, heat the oil
  2. Add sliced onion and mushroom into the pan. Saute it well until the onion become translucent and the mushroom is tender.
  3. Add water, soy sauce, mirin, sugar, garlic, and ginger powder into the pan
  4. Stir them well on the medium heat until the sugar dissolved and the sauce start to boil
  5. Lower the heat and let it simmer for about 2 minutes
  6. Add corn starch mixture a little bit a time until the sauce is thickened.
  7. Turn off the heat.
Let's make the noodle :
  1. In a big pot, boil about 1,5 liter water
  2. Wash the bok choi and put it in the boiling water. Boil the vegetable until tender.
  3. Remove the vegetable using a small strainer or chop stick or fork, put it on a plate, and set aside.
  4. Boil the noodle on the same boiling water. See the package for the cooking time direction. 
  5. Drain off the water from the noodle using a strainer.
  6. Put the noodle back on the pot.
  7. Add vegetable oil, soy sauce, and ground pepper. Mix them well. 
Finally. Let's serve them together. 
  1. In a bowl, put 1 portion of noodle.
  2. Put crispy chicken on the top of noodle.
  3. Put the vegetable on the side of the chicken.
  4. Pour the sauce on the top of the chicken. 
  5. Add shu mai or wan tan or fish ball if you want. I'm using shu mai
  6. Enjoy. 


Saturday, August 17, 2013

Merdeka!! Happy Independence day, Indonesia. On August 17, 1945, Indonesia declared its independence from Netherlands. It is the most important day on the history of my country. In Indonesia,  we always begin this celebration with flag hoisting ceremony and continue with a lot of festivals and celebrations everywhere. In all islands and cities on this country. Around this time of every year, everything seems to be draped in our flag's color, red and white. It is very festive. :)

Now, I'm living far away from Indonesia. Well, maybe it is not the best country on the world, but it is still my hometown. That's why, i would like to do small celebration on my own. I made red and white pudding today. It is easy to make and my kids love it.


Ingredients :
  • 1 pack agar powder (I'm using white Swallow Globe agar. I bought it in Asian grocery store)
  • 1 sheet of leaf gelatin, soaked in a cold water for 5 minutes
  • 1 litre (about 4 cups) water 
  • 5 tbs sweet condensed milk
  • 6 tbs granulated white sugar
  • red food coloring agent
Tip : You can substitute leaf gelatin with gelatin powder. 1 sheet of leaf gelatin = 1/4 tbs gelatin powder

Preparation :
  1. Prepare pudding mold any shape you like, set aside. I was using 21x11 cm loaf pan.
  2. In a pot, mix 1 pack agar powder with 1 litre water.
  3. Turn on the heat and cook the agar until it is start to boil
  4. Keep stirring for about 3 minutes and turn off the heat
  5. Divide the agar into half. About 500 ml for each portion.
  6. Add 5 tbs sugar and few red food coloring agent into the first portion. Stir it well until the sugar dissolved.
  7. Pour the red agar into the mold until its height reach half of the mold. 
  8. Leave it hardened for a while
  9. Meanwhile, prepare the white part. Add 5 tbs sweet condensed milk and 1 tbs sugar into the second portion. 
  10. Stir it well until the sugar dissolved. Put it on the medium heat if needed.
  11. After the surface of red agar is started to hardened, pour the white agar  carefully on the top of the red agar using a ladle. Be careful not to break the surface of the red agar otherwise, it won't be layered well.
  12. Leave it hardened and put it into the refrigerator. 
  13. Serve it cool as a dessert. Vanilla custard is a good companion for this dish.
Tip : You can start to pour the second layer of agar when the first layered is started to hardened. If you gently touch the surface of the agar, you can feel a thin and soft layer on the surface, but the agar on the bottom is still wobbly. If the first layer is too hard, then both layer can not stick together. 

Thursday, August 15, 2013

I still have about 500 ml left over coconut milk in my refrigerator.  I have to use it as soon as possible before it turns bad. I was thinking to make some cake, or cookies, or something like that. But 1 batch of cake or cookies only needs about 200 ml coconut milk. 500 ml is way too much for this. Finally i decided to make nasi gurih out of it. Easy and delicious for our dinner. I just need to cook the rice together with the coconut milk. Nasi means rice, and gurih means savory. The coconut milk will give savory taste to the rice. It is very popular in Indonesia. Some of us call it nasi uduk. In Malaysia, it is popular as nasi lemak.


There are 2 ways to make this rice. With or without rice cooker. I know some of you do not have rice cooker. So I will explain how to cook it in 2 ways. Let's get started.

Ingredients :
  • 2 cups of rice
  • 1 can (400 ml) coconut milk
  • 200 ml water
  • 1 lemon grass
  • 1 bayleave, cut into 3 parts
  • 1 pandan leave, cut into 3 parts
  • 1/4 tsp salt
Preparation (without rice cooker) :
  1. In a big bowl, wash the rice, and drain the water. Do it repeatedly 2 or 3 times.
  2. Transfer the rice into a big pot or pan
  3. Add coconut milk, water, pandan leave, bayleave, lemongrass, and salt
  4. Stir lightly and level out the rice.
  5. Turn on the stove and bring the water to boil. Do it on medium heat and with uncover pan/pot. You will see the bubbles forming gently in the edge of the pot/pan.
  6. Turn the heat down to low, cover the pot, and let it steamed for about 20 min until the water is absorbed and the rice is soft. Be careful not to burn the rice.
  7. Turn off the heat, do not uncover it, and let the rice sit in the pan/pot for about 10 min.
  8. After 10 min, open it and fold the rice few times with plastic or wooden paddle to mix all the fat from coconut milk that left on the surface of the rice. 
    Preparation (with rice cooker) :
    1. In a big bowl, wash the rice, and drain the water. Do it repeatedly 2 or 3 times.
    2. Transfer the rice into rice cooker bowl. 
    3. Add coconut milk, water, pandan leave, bayleave, lemongrass, and salt
    4. Stir lightly and level out the rice.
    5. Turn on the rice cooker and cook the rice until it's done.
    6. When it's done (usually there's an indicator in the rice cooker when the rice is cooked), do not open the rice cooker, and let the rice sit for about 10 min.
    7. After 10 min, open it and fold the rice few times with plastic or wooden paddle to mix all the fat from coconut milk that left on the surface of the rice. 
    Tip : My mother taught me how to measure the water when i need to cook rice. It is ancient way but it is
    always work for her and for me. Maybe for you as well? After transfer the pre-washed rice into the pan or pot or rice cooker bowl, add the water, and level out the rice. Place the tip of your middle finger on survace of the rice. The height of the water's surface should be as same as your first knuckle of your middle finger. 


    Nasi gurih is usually served with assortment of side dishes such as chicken, egg, beef, stir fry vegetables, anchovy, peanuts, tempeh, tofu, starch crackers, and sambal (ground chilli sauce). 


    For my dinner, i served it with ayam panggang bumbu rujak, string beans stir fry, oseng tempe tahu, sliced cucumber and tomato, and fried shallot.  


    Wednesday, August 14, 2013

    This is another popular dishes in my hometown, Malang, Indonesia. Ayam Panggang Bumbu Rujak. I'm not really sure the translation in English. I think "Grilled chicken with spicy sauce" is proper enough. This dish is originally from East Java. The chicken will be cooked together with the spices until aromatic and grilled using a charcoal grill. This dish can be easily served together with any kind of vegetable (raw or stir fried) and any kind of carbohydrate. Well.. I usually eat it with hot steamed rice. It goes well too with nasi gurih. Yum! Heel erg lekker ^^


    Ingredients :
    • 1 kg chicken (about 4 chicken thighs)
    • 2 1/2 medium shallots (or 6 Indonesian shallot), peel
    • 5 cloves of garlic, peel
    • 5 chili peppers, removes the seeds
    • 5 candlenuts
    • 1/2 tsp galangal (laos) powder (or 2 cm fresh galangal)
    • 1/4 cup tamarind water (or 1/4 tsp tamarind paste)
    • 2 tbs palm sugar
    • 2 bayleaves
    • 1 lemongrass
    • 2 tbs sweet soy sauce
    • 75 ml (1/4 cup) water
    • 4 tbs vegetable oil
    • salt and pepper
    Tip :  To make tamarind water : 1 tsp seedless tamarind + 1/4 cup warm water (stir and squeeze the tamarind until the water becomes dark brown and remove the tamarind) = 1/4 cup tamarind water. If you're using tamarind paste, adjust the amount of water. Add about 125 ml (1/2 cup) of water instead of 75 ml.

    Tip : Add 1 or 2 cabai rawit (bird's eye chili) if you want to increase the spiciness. Blend it together with shallots, garlic, candlenuts, and chili pepper. Cabai rawit or bird's eye chili is a small chili pepper that usually found in Southeast Asia. Some people call it Thai chili. This chili is much more spicy than chili pepper.

    Preparation :
    1. Clean and cut the chicken into pieces. Set aside.
    2. Blend together shallots, garlic, chili pepper, candlenuts, and galangal. 
    3. In a big pan, heat vegetable oil.
    4. Add the blended spices into the pan and saute until fragrant. 
    5. Put the chicken pieces into the pan and stir until all all of it are covered with the spices
    6. Add tamarind, palm sugar, bayleaves, lemongrass, sweet soy sauce, and water into the pan
    7. Stir them well.
    8. Cook until the spices are absorbed and almost all the water are evaporated. 
    9. Prepare the grill.
    10. Separate the chicken from the spices and remove it from the pan.
    11. Transfer all the spices into a bowl and set aside.
    12. Grill the chicken pieces until their color become dark brown. Brush them occasionally with the spices using pastry brush.
    13. When its done, cover again the chicken with the spices, and serve it in a big plate. 
    For the grilling process, I was using my indoor electric grill. Let me show you mine.

    You can use charcoal grill if you want. If there are no grill available in your house, you can use oven. Set your oven temperature into 200 C (390 F). If you have broiler feature in your oven use it. Transfer the chicken in a ovenproof dish. Put it on the 2nd top rack of your  preheated oven/broiler and bake the chicken for about 8-10 minutes or until they become dark brown. Turn it over and bake again until browned on both side. 


    Tuesday, August 13, 2013

    Today, I want to talk about something geeky. It's about wheat flour. Few weeks ago, my friend asked me if she can substitute all purpose flour with whole wheat flour for her cake. I'm pretty sure, a lot of bakers can give her a good answer. But some of us maybe do not quite sure about it or maybe never even heard about whole wheat flour. It tickles me for days. I decided to do some small research, read my old books, and open my university final essay. Oh yeah. I learned about this kind of thing back than in university. But it was like 7 or 8 years ago and I haven't touched it again for that period of time. I'm a little bit rusty now.  But let's see how far i can remember and refresh my memory. First, let's talk about wheat flour. :)

    Wheat Flour

    Wheat flour is product that is made from wheat by removing the brown surface coating (the bran) and the
    embryo (the germ) and reducing the particle size (by grinding and sifting) into a fine product. It can be used and even the largest ingredients for many kind of baked product, for example, bread, cake, biscuit, cookies, crackers. Wheat flour has a very important protein which is called gluten. Gluten plays very important role to give specific characteristic for each baked product. It gives elasticity and extensibility of the product.

    Gluten is formed by 2 kinds of protein which are gliadin and glutenin. Gliadin will give elasticity to the dough, and glutenin will give firm and tough texture at the dough. With presence of water and kneading process, gliadin and glutenin will make crosslinks and bond together to create a stretchy, net-like matrix.  The protein content and the quality of gluten in flour is dependent on the type of wheat that were used. Therefore,  based on protein and gluten content, basically there are 3 types of flour which are :
    • Strong flour (made from hard grain with high protein contents that give elastic but inextensible gluten. The protein contents of strong flour is usually in the range 10.5-14.5%. This kind of flour is perfect for making bread)
    • Medium flour (made from wheat with medium protein contents or mixed from hard and soft wheat. The protein content of medium flour is usually in range 8.5-10.5%.)
    • Weak flour (made from wheat with lower protein contents that give more extensible but less elastic gluten. The protein contents of soft flour is usually less than 8.5%. This flour is perfect for biscuit productions)
    As you know, nowadays there're a lot of type of flour in the market. Not only soft, medium and hard flour anymore. We can find self rising flour, cake flour, all purpose flour, semolina, durum, pastry flour, whole wheat flour, bread flour, gluten flour, bleached flour, and instant flour. The most common flour that i can find in the store nearby are all purpose flour, self raising flour, whole wheat flour, and instant flour for cake and for bread. I don't want to talk about self raising and instant flour. They already contained some raising agent such as baking powder or yeast. Let's talk about all purpose flour and whole wheat flour. Nowadays, they are the most common type of flour. What are they?

    All purpose flour

    All purpose flour is the most widely used flour. It comes from the finely ground part of the wheat kernel called the endosperm. The endosperms were separated from the bran and germ during milling process.

    All purpose flour is made from blend of high gluten wheat and low gluten wheat so it has protein content in range 9-12% (depend on the brand). That's why all purpose flour can be categorized as medium-strong flour. All purpose flour can be used universally for a wide range of food products such as yeast bread, cakes, cookies, biscuit, pastry, doughnut, and many thing else.

    Is all purpose flour the same with regular plain wheat flour? The answer is yes, it is. Regular plain wheat flour have protein content in range between 9-12% like all purpose flour. In here, Netherlands, I won't be able to find flour with "All purpose flour" written on its package. I only can find patent tarwebloem (fine wheat flour) or volkoren tarwebloem (whole wheat flour). Or self rising flour, bread flour, and cake flour. But i always buy patent tarwebloem which i consider it as all purpose flour because it is regular plain flour with protein content 11 grams/100 grams flour. I will use it for making any kind of food such as cake, cookies, doughnut, bread, even for thickening agent in cream soup.

    Whole Wheat Flour

    Whole wheat flour is one type of wheat flour which is composed of 99% wheat grain. It is made by grinding the whole grain of wheat including the bran and the germ. That's why it is called whole wheat flour. Because whole wheat flour contains all part of the grain, its color is darker and more brownish than regular plain flour.


    I tried to take a picture of both type of flour. The left one is all purpose flour, and the right one is whole wheat flour.  As we can see, whole wheat flour has some brownish particle mixed in the flour. That stuff are wheat bran. The bran can not be grained as well as the endosperm. That's why it gives whole wheat flour a rougher texture than all purpose flour. 

    What's the difference between all purpose and whole wheat flour?

    Based on USDA Nutrient Standard Reference Database, whole wheat flour has higher protein content than all purpose flour. It has 13.21 grams protein/ 100 grams flour meanwhile all purpose flour only has 10.33 grams protein/ 100 grams flour. So, does it mean that whole wheat flour has higher gluten than all purpose flour? The answer is NO. Whole wheat flour has lower gluten than all purpose flour. Hey, how come?? 

    Back to the definition and the raw material of each flour. Whole wheat flour is made from whole grain including the bran and the germ. The bran and the germ itself contain some protein. But all purpose flour is made only from the endosperm.  Let's consider that about 3 grams protein content difference are from the bran and the germ. So basically, the endosperm has the same protein content, which can be assumed they both has same gluten content. But why whole wheat flour product can not form gluten as well as all purpose flour product? Once again, it is because of the bran and germ. 

    Before we're talking about bran, let's back to how gluten formed for a while. Gluten is formed from 2 proteins which is gliadin and glutenin which will interact with presence of water during stirring or kneading process. There are some factor which can affect gluten formation. One of them is the presence of bran and germ. The bran can do some physical disruption of expanded gluten matrix. Bran can cut trough gluten matrix during the kneading or mixing and thus will weaken the gluten structure formed. Beside that, it is possible that there is a competition between bran and gluten protein to absorb water during the process. It will decrease the gluten that formed because gluten formation definitely need water. 

    Meanwhile, wheat germ contains a substance called glutathione. In world of baked product, glutathion is common called as a gluten inhibitor because it can limit the development of gluten. That's why,  it is always suggested to add bread flour or gluten flour to make whole wheat bread to keep the texture of the bread. 

    I did a small experiment on my kitchen using all purpose and whole wheat flour. I made 2 recipes of orange muffins. One was using all purpose flour and the other was using whole wheat flour (I was using whole wheat flour only 3/4 part of total flour and using all purpose flour for the rest). I was using the exact same recipe for both muffins except the type of flour. 


    This is the result. The muffin on left side on both pictures is made using all purpose flour (let's call it muffin A) and the other is made using whole wheat flour (let's call it muffin B). The texture of muffin A is softer than muffin B. Inside and outside. The color of muffin A is lighter than muffin B. The most interesting is the difference of their shape. Muffin A is more compact than muffin B. As we can see in the picture, the top part of muffin B is wider than muffin A. It seems that the batter spreading too much during the baking process. I think it is because the gluten that formed in muffin B is not strong enough to hold the shape of the muffin like in muffin A. Muffin B is crumbly a lot as well even though it is heavier and more dense than muffin A.

    I did some preference test as well. I asked my friends and my family to try them and compare which one is they like more. Most of them choose muffin A because it is softer than muffin B. I personally prefer muffin B than muffin A because for me the bran that presence in muffin B give a unique taste and texture in my mouth. But overall they are edible, acceptable, and taste great. 

    So, answering the very first question. Can we substitute all purpose flour with whole wheat flour? Yes we can. But it would be better if we do not substitute the whole part of flour with whole wheat flour. It is needed in order to keep the texture and shape of the product. Some reference said substitute 70% and add the rest with all purpose flour or gluten flour. Meanwhile, other reference said 50:50 is good. And it is depend on the type of baked product. Too bad i do not have time and material to do all those experiment. I was thinking to do the experiment with dinner roll and playing with the amount of whole wheat flour for my muffin. But this is good enough to satisfy my curiosity. :)

    Why  does whole wheat flour exist? What is the advantage adding bran and germ into the flour?

    See you on part 2 with the answer :)

    References : 


    Monday, August 12, 2013

    Today, I want to make a dish using 2 most popular food in Indonesia. Tofu and tempeh.

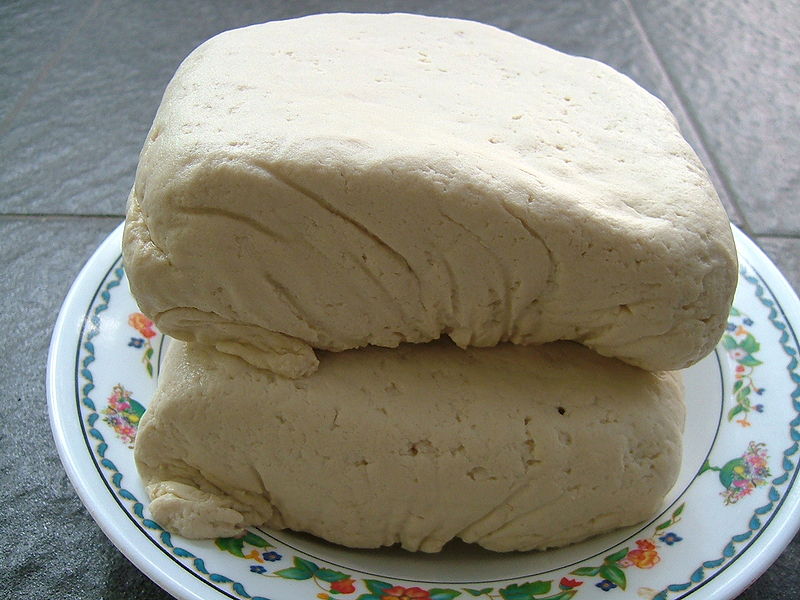
    I think most of you already familiar with tofu especially if you are vegetarian. Tofu is a very popular food in Asia, especially in East and Southeast Asia. It is a food made by coagulating soy milk and pressing the curds into a soft white block. This pressed soy bean curd is called tofu. There are many different varieties of tofu based on their firmness such as firm tofu, soft tofu, brittle tofu, etc. It is depend on the coagulants that were used during the process.

    Source : id.wikipedia.org

    In Indonesia, firm tofu is very popular. We call it tahu. We usually fry them, and eat them with chili pepper, or with fermented shrimp paste. In Netherland, i usually find it in Asian grocery store. There are so many different kind of tofu from different country. Japanese tofu, Chinese tofu, Indonesian tofu, and so on.

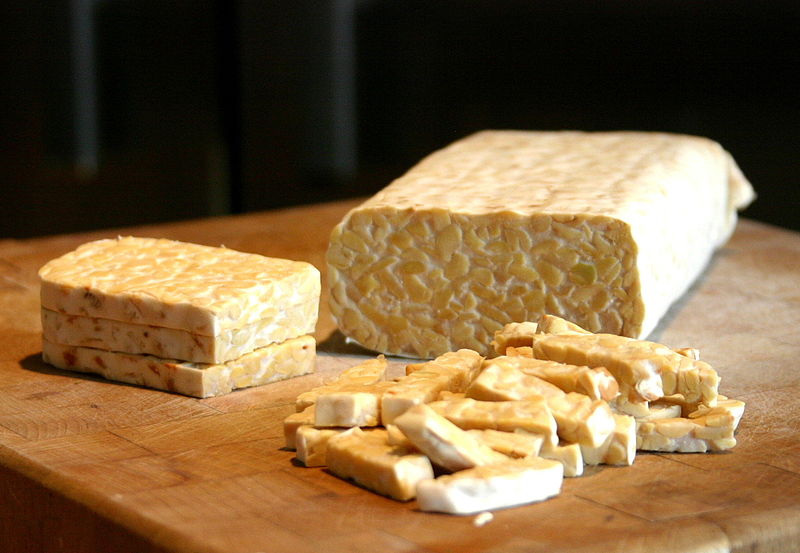
    What is tempeh? Maybe some of you ever heard of it especially when you are talking about vegetarian dish. But I'm not sure all people know what it is. Tempeh is a traditional soy product from Indonesia that is made by controlled fermentation process. The fermentation process will bind soybeans into a cakeform and make tempeh has a higher content of protein, dietary fiber, and vitamins that the soybeans itself. Because of its nutritional value, tempeh often used in vegetarian cuisine as a meat analogue.

    Source : id.wikipedia.org

    Indonesian people has many different way to cook tempeh. Sometimes, we will marinade tempeh with spices and deep fry them. We call it fried tempeh or tempe goreng. Sometimes we will make a stir fry tempeh with a lot of spices. Sometimes we will boil them together with another vegetables in coconut milk and spices. We call it lodeh. I like them all.  Oh.. I just make myself homesick. So let's get started!!

    Ingredients:
    • 300 grams tempeh, cut into small cubes (about 1x1x2 cm, no need precise cut)
    • 300 grams firm tofu, cut into small cubes (about 1x1x2 cm, no need precise cut)
    • 2 chili peppers, remove the seeds and thinly sliced
    • 1 medium shallot ( about 3 Indonesian shallots), cut stripes
    • 1 clove of garlic, minced
    • 2 tbs sweet soy sauce
    • 1 tbs soy sauce
    • 1/2 tsp galangal (laos) powder 
    • about 75 ml (1/4 cup) water 
    • 1 tbs palm sugar
    • about 1 cup vegetable oil
    • salt and pepper

    Preparation :
    1. In a pan, heat vegetable oil.
    2. Fry tempeh until the outside color become brown. 
    3. Remove tempeh from the oil, drain them well, and set aside.
    4. Fry tofu until the outside color become dark yellow.
    5. Remove tempeh from the oil, drain them well, and set aside.
    6. In a big pan, heat 3-4 tbs vegetable oil.
    7. Put shallot, garlic and chilli peper into the pan and saute them well until shallot become translucent
    8. Add fried tempeh and tofu into the pan, stir them well.
    9. Add water, both soy sauce, galangal powder, and palm sugar.
    10. Keep stirring for about 5-10 minutes and all tempeh and tofu are seasoned well.
    11. Add salt and pepper. 
    12. Serve it with hot steamed rice.

    Serving size : 4-7 person.
    Tip : If you are using fresh galangal (laos), use about 3 cm fresh galangal, press it with the side of a  knife, and add it into the pan together with shallots, garlic, and chili pepper.


    Thursday, August 8, 2013

    I just realize that I have many tangerines on my refrigerator. They have been hiding quietly on the corner of my refrigerator for (maybe) a week. I almost forget about them until yesterday. So, i decided, today is the time to do my 2nd summer vacation project with my daughter. Orange muffins!


    But, consider this is as a failed project. My daughter is more interested watching Barbie as the island princess on TV instead of baking muffin with me in the kitchen. She only wants to help with placing muffins paper in the muffins tin. That's all.

    Well... I already prepared all the ingredients. So i have to continue this small project.

    Ingredients :
    • 2 tangerines, peel the skin, remove the seeds and thin skin of every segments.
    • 100-110 ml orange juice 
    • orange zest from 1 big orange
    • 225 grams (1+3/4 cups) All purpose flour
    • 150 grams (3/4 cup) white granulated sugar 
    • 1 egg
    • 113 grams (1/2 cup) room temperature butter 
    • 1 tbs milk
    • 1 tsp baking powder
    • 1/2 tsp baking soda
    Tip :  We can use 1 (about 425 grams net) medium canned tangerines instead of 2 fresh tangerines. Drain the canned tangerines and use them. Leave the syrup for another purpose. 

    Tip : From 1 big orange, we should be able to get at least 100 ml orange juice. We will need about 100-110 ml orange juice. If we can't get at least 100 ml orange juice, we can use 2 oranges to get the juice.

    Preparation :
    1. Preheat oven 180 C (356 F). 
    2. Prepare and line a muffin tin with muffin papers. Set it aside
    3. In a bowl, mix well all dry ingredients.
    4. In another large bowl, mix butter and eggs until soft.
    5. Add orange juice, peeled tangerines, orange zest, and milk. Mix them well.
    6. Add all dry ingredients into mixed wet ingredients. Mixed them well.
    7. Divide the batter into a prepared muffin tin. (about 1.5 tsp for small muffin tin and 4 tsp for a normal size muffin tin)
    8. Put them into preheated oven and bake them for about 20 min
    I made 2 version of muffins using 2 different type of flour. All purpose and whole wheat flour. We can see the difference of their color.  Muffins that were made from all purpose flour have lighter color than muffins with whole wheat flour.  But both of them taste great. Slightly different, but still great. 


    I made mini orange muffins as well because i want to pack them and bring them outside. There is a small park with small playground nearby. So this afternoon, I will bring my children to go there, let them play for a while and eat this mini muffins after that. Sounds good, isn't it? :)